Loading assets in React Three Fiber - Zero to Hero
Loading reactions...
This is a very extensive blog that covers both basic and advanced topics. Don't worry if you do not understand everything. Take your time and come back to it later if needed.
Introduction 👋
Reason of writing
After using R3F (React Three Fiber) in production for over two years, I have learned a lot about loading assets, the best practices, and the pitfalls it brings.
Much of the information is scattered across docs, GitHub & CodeSandboxes, and I want to create a single source of truth on this topic.
By the end of this blog, you will have a deep understanding of how loading assets in React & R3F works and how to improve the user experience and performance of your applications.
Target audience
Developers that want to...
- learn the best practices for loading assets in R3F
- improve the UX & performance of their R3F applications
- learn more about advanced React concepts in combination with R3F
Prerequisite knowledge
- Basic knowledge of Three.js
- Basic knowledge of R3F
- Basic knowledge of React
The Three.js way 👎
Before we learn the best practices, it is important to understand why we should use them and what might happen if we don't.
The first and most important concept to understand is that we are working in React. This sounds obvious, but it requires a fundamentally different mental model compared to Three.js and vanilla JavaScript when it comes to handling async operations. Let's take a closer look 🔍
Example
When you just started with React & React Three Fiber, you might have tried something like this:
At first, nothing seems wrong with this code:
- We create a texture using the
TextureLoader - We have a mesh with a
boxGeometryand ameshBasicMaterial - We pass the texture to the
meshBasicMaterial
And if we run the code, it just works as you would expect.
import * as THREE from "three";
export function MyMesh() {
    const texture = new THREE.TextureLoader().load("https://raw.githubusercontent.com/AaronClaes/my-site/main/public/react.webp");

    return (
        <mesh>
            <boxGeometry />
            <meshBasicMaterial map={texture} />
        </mesh>
    );
}
Now let's take a closer look at what is happening here and why it is so bad.
Problems
In React, components re-render when their props or state changes. This is a fundamental concept in React and is what makes it both powerful and tricky.
Because we are using React components, the rules of re-rendering apply to us as well.
This means that every time the MyMesh component re-renders, TextureLoader will be recreated & called again.
Let's take a look at what happens when we add a bit more functionality to our component:
We applied the following changes:
- We added a
scalestate to our component - We added an
onClickhandler that increases the scale by 10% - We pass the
scaleto themeshcomponent
This means that everytime we click on our mesh, the scale state will update, and our component will re-render.
import * as THREE from "three";
import { useState } from "react";

export function MyMesh() {
    const [scale, setScale] = useState(1);
    const texture = new THREE.TextureLoader().load("https://raw.githubusercontent.com/AaronClaes/my-site/main/public/react.webp");

    const handleClick = () => setScale(p => p + 0.1);

    return (
      <mesh onClick={handleClick} scale={scale}>
        <boxGeometry />
        <meshBasicMaterial map={texture} />
      </mesh>
    );
  }
Click the mesh a few times. Do you notice the problem? If not, your browser might be saving you from any trouble by caching the image file. I suggest you disable caching in the devtools.
Now you should notice two problems with our application.
Recreating the texture
The texture very briefly disappears when the image is being fetched. (throttle your network to see it more clearly)

This indicates that we are creating a new texture on every re-render.
Don't believe me? Try adding a console.log(texture.uuid) statement inside MyMesh and notice a new uuid being logged in your console.
No caching
Our second problem can be spotted inside the network tab of the devtools.
On each click, our react.webp image is being refetched.
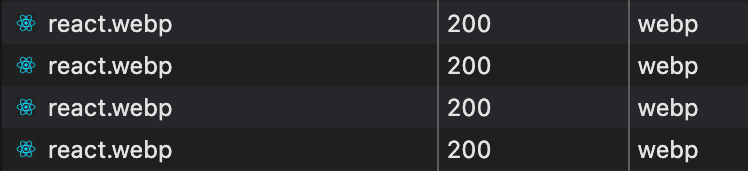
Not only will this increase the load on your server, but it will also slow down the application.
Now imagine you have a more complex application, where a texture is being used by multiple meshes. Each component will create a new texture, and the image will be refetched on every re-render for every component.
In a small application like our example, this might not be a big deal, but in a larger and more complex application, it can lead to serious performance issues.
But do not worry, React & React Three Fiber provides us with all the tools we need to load assets correctly.
The R3F way 👍
The maintainers of R3F were clearly aware of the re-render problems and provided us with built-in solutions. Let's take a look at how we can use them.
Example
The correct way to load textures in R3F is by using the useLoader hook.
The useLoader hook requires two arguments:
- A loader (e.g.
TextureLoader,GLTFLoader) - The path to the file you want to load
The useLoader hook takes additional (optional) arguments for more advanced
use cases. More info can be found in the
docs & later in
this blog.
Before we look at how the useLoader hook works, let's ensure the two problems we had with the Three.js way are solved.
- The texture is recreated on every re-render
- The image is refetched on every re-render
Let's recreate our previous setup, where we click on the mesh and the scale increases.
An important side note is that MyMesh will still re-render on each click. It
is how React works and is required to display the new scaled mesh if you
modify it via props.
import * as THREE from "three";
  import { useLoader } from "@react-three/fiber";
  import { useState } from "react";

  export function MyMesh() {
      const [scale, setScale] = useState(1);
      const texture = useLoader(THREE.TextureLoader, "https://raw.githubusercontent.com/AaronClaes/my-site/main/public/react.webp");

      const handleClick = () => setScale(p => p + 0.1);

      return (
        <mesh onClick={handleClick} scale={scale}>
          <boxGeometry />
          <meshBasicMaterial map={texture} />
        </mesh>
      );
    }
Open the devtools again, turn off caching, and open the network tab. You will notice that the texture is not being refetched on each click and not being recreated on each re-render.
Don't take my word for it, add the console.log(texture.uuid) statement again, click the mesh, and notice the same uuid being logged in the console.
As you can see, the magic of the useLoader hook allows us to load textures correctly in R3F, without needing to worry about React and its re-renders.
Congratulations! 🥳 You learned the correct method to load assets in React Three Fiber! Would you believe me if I told you this is just the start? 🤯
Let's dive a bit deeper into the useLoader hook and go over the features it offers and how they work.
Caching
The two main problems we had with the Three.js way of loading assets are solved by the caching functionality of the useLoader hook.
Instead of just caching the file we fetch, everything returned by the loader (that we passed as an argument) is cached. In case of a TextureLoader that would be a Texture, but the same happens for a GLTFLoader, OBJLoader, ...
Later on in the blog, we will take a look at some examples where this might cause unexpected issues, but for most use cases this is the behavior we want. It is important to remember that creating new instances of Three.js classes can be expensive, so reusing and caching them is great for performance.
To do this, R3F makes use of the react-suspense library. As the name suggests, it allows R3F to seamlessly integrate with the Suspense features offered by React, and integrate caching. This brings us to the next feature of the useLoader.
Suspense
If you are new to React, Suspense might be a bit hard to grasp at first,
make sure to check out the React
docs for a more in-depth
explanation.
Suspense in its simplest catches a promise and allows us to display a fallback while we wait for the promise to be fulfilled.
It does this by catching a promise thrown by a component inside the Suspense, unmounting everything it wraps around, and displaying the fallback element (if provided) until the promise is resolved.
Let's take the following code:
The following will happen:
- The
LazyComponentthows a promise. - The
Suspensecatches the promise and unmount its children. (in this caseLazyComponent,OtherComponentandOtherComponentTwo - The
Spinneris displayed until the promise is resolved. - The children mount with the data from the promise.
Mounting & unmounting means that the components are added to or removed from the DOM.
In the case of React Three Fiber, we cannot display a fallback UI while loading an asset, because rendering HTML elements inside the three.js canvas is impossible. But that doesn't mean that Suspense cannot be useful for us.
Later in this blog, we will learn how to display UI as a fallback
anyway, with the Html component from Drei.
So how is Suspense useful to us? Let's take a look.
Each time useLoader loads an uncached asset, it will throw a promise, which suspends the application.
This gives us full control over the loading states inside our Canvas.
You might be thinking, our useLoader example works just fine without a Suspense component, so when would this be useful for me?
Well, there is a gotcha. You are already using it. The Canvas component from R3F has a built-in Suspense that wraps your entire scene.
In the source code, we can find this snippet.
So why is it there, and what does it do?
If we return to our useLoader example and refresh it, we notice that we first have a white canvas, and then the cube appears with the texture. It never renders without the texture.
This happens because our useLoader suspends the application until the texture is loaded, which means everything inside our Canvas is unmounted until then.
Great right? Zero flickering textures & everything is loaded before we start rendering. But what if we want to load new assets after an interaction happens?
If you have experience with Suspense, you might already know where I am going with this.
First, we modify our previous example to include a second cube with a different texture. We now have a ReactCube and a ThreeCube component.
To view the ThreeCube, we need to click on the ReactCube.
import { useState } from "react";
import { ReactCube } from "./react-cube";
import { ThreeCube } from "./three-cube";

export function MyScene() {
  const [cubeVisible, setCubeVisible] = useState(false);

  const handleClick = () => setCubeVisible(p => !p);

  return (
    <>
      <ReactCube onClick={handleClick} />
      {cubeVisible && <ThreeCube />}
    </>
  );
}
When you click the ReactCube, you should notice a problem. If you don't see it, try throttling your network.
The moment you click on the cube, the texture starts loading, and everything disappears until it is ready.
Remember the Suspense inside the Canvas? It is the reason why this happens. As we learned earlier, the Suspense unmounts its children until the loading is done, which includes the ReactCube.
To solve this, we need to make sure that only the ThreeCube unmounts, since that's the only element related to the loading texture.
To do this, we can wrap the ThreeCube inside a Suspense.
Because the promise thrown by useLoader is caught by the first Suspense up the component tree (our Suspense), the problem is now solved.
The Suspense needs to be outside of the component that throws the promise.
In this example, it is the ThreeCube component with the useLoader.
import { useState, Suspense } from "react";
import { ReactCube } from "./react-cube";
import { ThreeCube } from "./three-cube";

export function MyScene() {
  const [cubeVisible, setCubeVisible] = useState(false);

  const handleClick = () => setCubeVisible(p => !p);

  return (
    <>
      <ReactCube onClick={handleClick} />
      <Suspense>{cubeVisible && <ThreeCube />}</Suspense>
    </>
  );
}
Click the cube and notice that ThreeCube appears when the texture is finished is loaded, while the ReactCube stays visible.
Parallel fetching
If you have experience as a web developer, you might be familiar with the waterfall effect. It happens when assets are loaded one after another, instead of in parallel.
It can slow down the loading time of your applications by a lot. Suspense can be great to prevent this, but only if you use it carefully and correctly. Let's learn how.
Using the power of Suspense & promises
In the beta version of React 19 is discovered that the internal working of
Suspense changed, which would make the following example not work as
expected.
The community spoke up against these changes, and the React team is now
putting React 19 on hold until the issue is solved. You can follow the discussion
here.
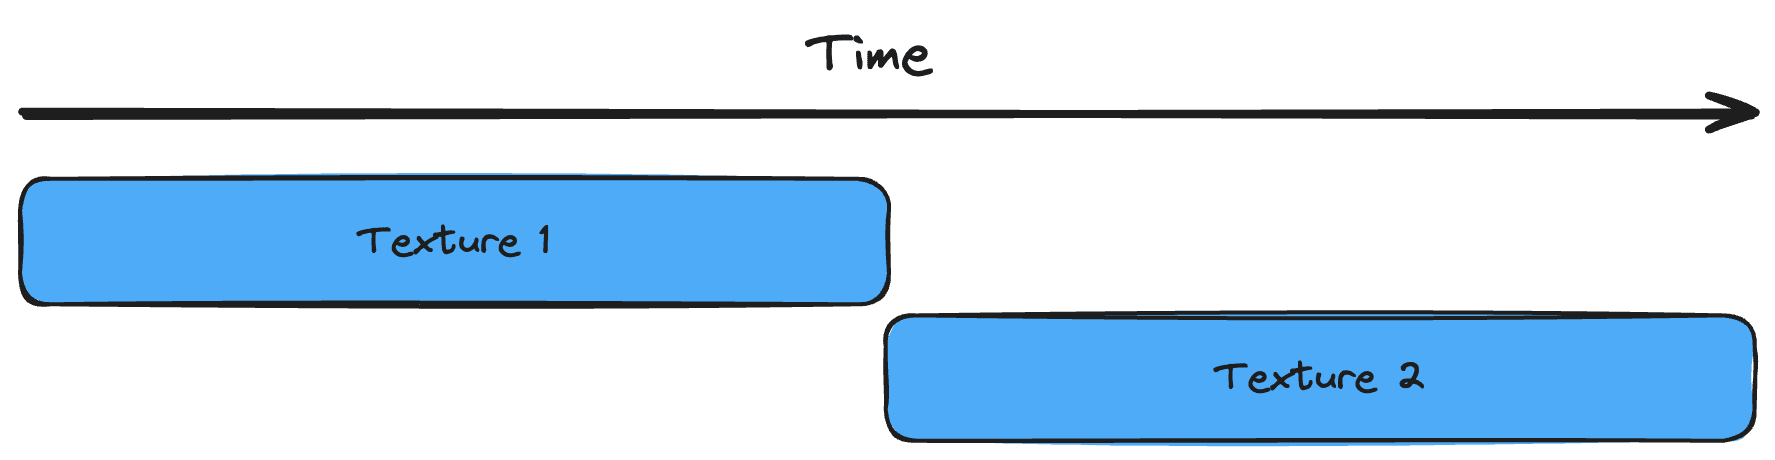
Suspense allows us to resolve async promises in parallel. This means we can load multiple assets simultaneously, instead of one after another.
Let's take a look at an example:
Both MyMesh components will throw a promise, which the Suspense component then catches. So both textures load in parallel. It works because Suspense does not stop looking for promises once it finds one. It also checks the remaining children to see if another promise is present.

Easy enough you might think, but let`s check out some situations where you might expect it to work the same way, but it doesn't.
Nested useLoaders
Let`s say you have a component that loads a texture, and inside that component is another component that does the same.
Is is a situation where you might expect both textures to load in parallel, but it doesn't work that way.
The reason is that a component starts rendering after the promise resolves. So MyMesh will only throw its promise after MyGroup is fulfilled and rendered.
So what happens is:
MyGroupthrows a promiseSuspensecatches the promise and unmounts its children- The promise fullfills, and the children are mounted again.
MyGrouprendersMyMeshthrows a promise- ...
Multiple useLoaders
A solution that might come to mind is to load the texture for MyMesh in MyGroup and pass it as a prop. It is possible, but could also cause the same problem if not done correctly.
The code should work, right? It doesn't. It still causes a waterfall effect.
The reason is that as soon as a promise is thrown, the Suspense triggers and the second useLoader will only be able to throw its promise after the first promise resolves.
What happens is:
MyGroupthrows a promise for the firstuseLoaderSuspensecatches the promise and unmounts its children- The promise is fulfilled and the children are mounted again
MyGroupthrows a promise for the seconduseLoader
So what is the solution?
You have to either structure your component similar to the first example or use the solution built in useLoader.
Multiple assets
The useLoader hook allows us to load multiple assets at the same time. You do it by passing an array of paths to the useLoader hook.
Because useLoader throws one promise that resolves both textures, they will be loaded in parallel and prevent a waterfall effect.
So what happens here is:
MyGroupthrows a promise that loads both texturesSuspensecatches the promise and unmounts its children- The promise is fulfilled, and the children are mounted again
Conclusion
The key takeaway from this is that Suspense is a powerful tool that allows us to control the loading states of our assets inside the Canvas.
However, it is important to remember that Suspense will only work great if used correctly.
I highly recommend you regularly open your devtools, check the network tab, throttle the network and see how your assets are loading. I am sure you will notice some things you did not expect.
Unfortunately, Suspense itself is not a perfect solution for all use cases. Let's dive into some more advanced loading strategies where its problems become clear, and how we can solve them.
React 18 hooks
You might have a mesh that requires a different texture based on some state. 3D configurators are a great example of this. A few cases:
- A backpack configurator that allows the customer to choose from different print patterns.
- A wallpaper configurator with a 3D wall to showcase the chosen pattern.
Let's set up a simple example to display some of the problems this causes.
We have an array with five different textures and a MyMesh component that allows us to cycle through them by clicking it.
import { Canvas } from "@react-three/fiber";
import { OrbitControls } from "@react-three/drei";
import { MyMesh } from "./my-mesh";

export default function App() {
  return (
    <div style={{ width: "100vw", height: "100vh", background: "white" }}>
        <Canvas>
            <OrbitControls />
            <MyMesh />
        </Canvas>
    </div>
  );
}
Click the cube a few times and notice the problem. The cube disappears while a new image is fetching.
It happens because useLoader doesn't only throw a promise when the first texture loads. Each uncached texture will throw a promise, causing the Suspense to unmount its children.
If you click a few more times until the cycle restarts, you notice that the problem no longer occurs. The textures are now cached and can be displayed instantly without throwing a promise.
The first solution that might come to mind is to move the Suspense inside our mesh and only wrap the material. For this to work, we need to move our material and useLoader into a separate component.
While this would slightly improve the user experience, because the cube will stay visible, it is not great. When we click our cube, the entire material will unmount and remount, which causes our cube to flicker.
The next solution you might try is to give Suspense a fallback material. It could slightly decrease the flickering if you match the color with your textures, but still not a great solution.
You could also write your custom logic to save the old texture and show it while the new one is loading, but this can get pretty complex and messy, especially if you need this logic in multiple meshes & components.
Luckily, React has two built-in hooks that allow us to counter this problem. useTransition and useDeferredValue.
useTransition
useTransition is an advanced React hook. Check out the
docs for more info.
As the React docs describe it, useTransition is a React Hook that lets you update the state without blocking the UI. In our case, without blocking our Canvas.
For our use case, we will use the hook to transition the change of the path of our texture.
We need to make following changes for this to work:
- We add the
useTransitionhook to our component, which returns a pending state and a function. - We add a
useStateto keep track of the transitionedmapPath. - We add a
useEffectthat transitions themapPathwhen theindexchanges. - We pass
mapPathtouseLoader.
It is quite a bit of extra code, but it does the job. Let's take a look at the result.
import { Canvas } from "@react-three/fiber";
import { OrbitControls } from "@react-three/drei";
import { MyMesh } from "./my-mesh";

export default function App() {
  return (
    <div style={{ width: "100vw", height: "100vh", background: "white" }}>
        <Canvas>
            <OrbitControls />
            <MyMesh />
        </Canvas>
    </div>
  );
}
When you click the cube, the old texture stays visible until the new texture is fully loaded. This is a great improvement over the flickering textures we had before.
The user experience is now exactly how we want it to be, but the code is a bit more complex.
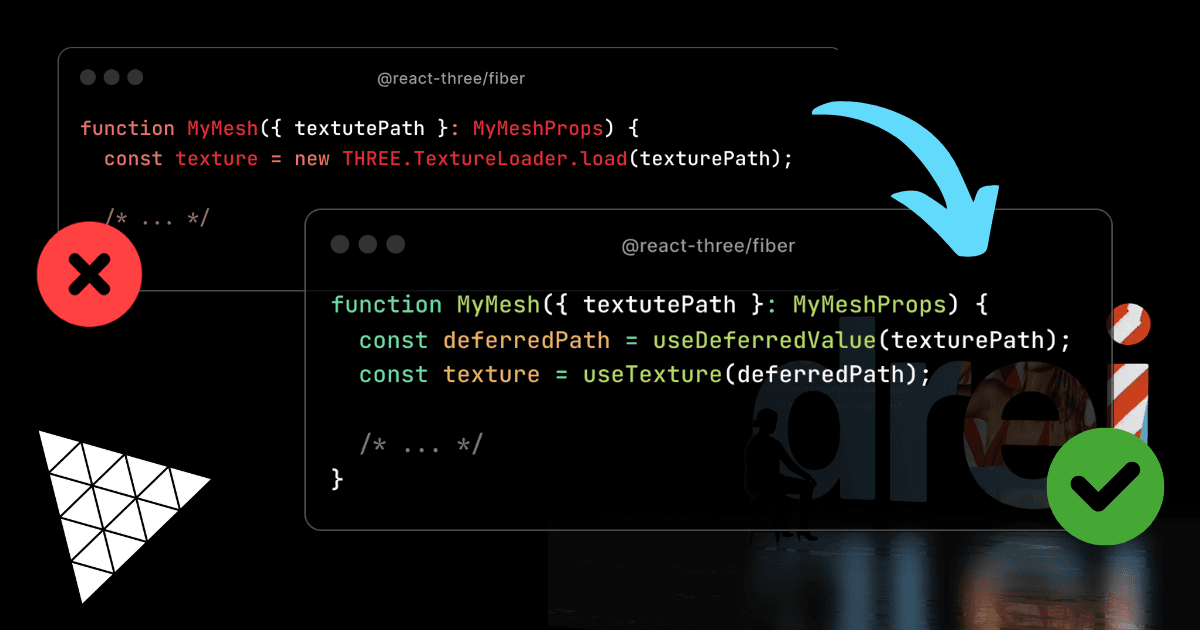
I do not often use useTransition because useDeferredValue allows us to achieve the same result with less code and complexity.
Let's find out how easy it actually is.
useDeferredValue
useDeferredValue is an advanced React hook but is very easy to use combined
with useLoader. Check out the
docs for more info.
useDeferredValue allows us to defer the update of our texture until the new texture is loaded. We keep displaying the old texture while we wait for the useLoader promise to finish. It is exactly what we need to solve our problem of flickering textures.
We can use it by returning to our original MyMesh component and applying some changes.
That's it, all we have to do is pass our dynamic path to useDeferredValue and pass the return value to useLoader. React and its magic will take care of the rest.
import { Canvas } from "@react-three/fiber";
import { OrbitControls } from "@react-three/drei";
import { MyMesh } from "./my-mesh";

export default function App() {
  return (
    <div style={{ width: "100vw", height: "100vh", background: "white" }}>
        <Canvas>
            <OrbitControls />
            <MyMesh />
        </Canvas>
    </div>
  );
}
You might want the isPending we had with useTransition, to notify the user that something is loading. You can do this by comparing the current path and the deferred path. We know that the texture is still loading if they are unequal.
Now you see why I prefer useDeferredValue over useTransition. It is easier to use and understand.
The useDeferredValue hook solved most of the problems I had with loading assets. It will be a game-changer if you did not know about it yet.
Let's continue learning more awesome features of the useLoader hook & React!
Preloading
Sometimes, it's preferable that an asset is available before it is actually needed. This is where preloading comes in.
This pattern does not require you to make any changes. It is just a method built into the useLoader hook.
To preload something, you simply call the preload method on the useLoader hook with the path(s) you want to preload.
Place the preload call outside your component if you want the texture to be available from the start.
It will ensure the texture loads during the initial suspension of the Canvas, so it is available when you need it.
It is just JavaScript, so you can preload assets whenever you want, even outside the React lifecycle.
When and what you preload is up to your use case. Some apps benefit from a longer initial loading time, while others might want to load assets on demand.
For example:
- Games always have an initial loading time, so preloading assets is a good idea.
- Web apps are expected to load fast, so preloading (too many) assets might not be a good idea.
The main loading strategies are now covered. You learned how to load assets correctly, handle loading states, and to preload assets. But we are not done yet.
In the upcoming chapters of this blog, I will go over more useful features of the useLoader hook, a library that makes loading assets even easier, and some general tips, tricks, and pitfalls to look out for.
Extra features
Clearing
The useLoader hook also has a clear method that allows you to clear all or
specific items from the cache. It can be great when you want to free up
memory.
Clear a specific item from the cache:
Clear multiple specific items from the cache:
Primitives
If you want to use the returned values of the useLoader in JSX, you can use the primitive component from R3F.
It takes an object prop and can be attached to a specific property of the parent with the attach prop.
When you use it for models, the object prop should be the scene property of the model.
Side note, most loaders are not part of the THREE export but are stored inside the
examples folder. You can import them like this:
Extend loaders
Sometimes you might want to extend a loader with custom settings. useLoader allows you to provide a third argument, which is a callback function that gives access to the loader.
Each loader has its methods and properties, so check the Three.js docs for more info.
Pitfalls
Mutating assets
It is important to remember that the assets returned by useLoader are cached references. This means that if you mutate the asset, it will for all components that use it.
Let's take a look at a code example.
In this example, MaterialRepeat2 and MaterialRepeat4 will have the same repeat value when rendered, depending on which comes last in the component tree.
Both cubes will have a repeat value of 4 in this example.
This is because the following happens:
MaterialRepeat2renders- The texture is loaded and mutated to have a repeat of 2.
MaterialRepeat4renders- The texture is taken from the cache and overwritten to have a repeat of 4.
To fix this, you can clone the texture before mutating it. This way, each one will be a unique Texture.
Keep in mind that this can still cause tricky situations. For example, if a component with a non-cloned texture renders first, and a component with a cloned texture renders second, the cloned texture will include the changes made to the non-cloned texture.
This is basic JavaScript behavior, but it is important to keep in mind when working with cached assets.
A hackish way to prevent mutation problems is to pass a version number to the path. This way, the path is unique, and the textures are cached separately. Remember that this is not a recommended solution, since the image will be fetched multiple times. But in some rare cases, it might be a good temporary solution to quickly fix an issue.
This is an anti-pattern, and should only be used as a last resort.
Conclusion
Congratulations! 🥳 You just finished learning about loading strategies in React Three Fiber. I know it was a lot, and don't worry if not everything clicked from the first time. Once you start using these patterns inside your applications, it will get easier to understand.
The next chapter takes us into the world of Drei, where we will learn about hooks and components that make loading assets even easier, while still applying the patterns we just learned. Let's dive in!
React Three Drei ✨
If you are unfamiliar with React Three Drei, an entirely new world of possibilities will open up for you.
React Three Drei is a collection of useful helpers and abstractions for R3F. It is created with composability in mind, which means that everything is plug-and-play. For me, it is one of the main reasons why R3F takes the edge over vanilla Three.js.
Drei has many components and hooks, but we will focus on those that help us load assets.
The community might add new loading hooks and components to Drei, so check the Drei GitHub page.
Loading hooks
Some asset types would benefit from extra features that are not part of the useLoader hook. For those asset types, Drei offers custom hooks.
The hooks are built on top of the useLoader hook, but with some specific improvements. Let's take a look at a few examples.
Because most loader hooks in Drei are wrappers around useLoader, everything
we learned in this blog post still applies.
useTexture
We have been loading textures throughout this blog, so it is only fair we mention the useTexture hook first.
The reason you would want to you use useTexture over useLoader is that it takes care of precompiling.
But why would we benefit from this? Three.js by default uploads the texture to the GPU when it is visible for the renderer. Which means that when the texture is behind the camera, it will not compile until it is actually seen by the camera. useTexture fixes this by doing the following for the loaded textures:
(Thank you @0xca0a for pointing this out to me!)
Preloading & clearing with useTexture works exactly the same:
Also, notice that we no longer need to pass the TextureLoader. It is built into the hook itself.
useGLTF
The useGLTF hook loads .glb and .gltf files. The reason you would want to use it over useLoader is because some of your models might have draco and meshopt compression. Custom logic is required to support this with useLoader, but luckily useGLTF has this built in.
You can use the compressed models like any other model:
Preloading & clearing works exactly the same:
Other hooks
Other loader hooks offered by Drei are useFBX, useKTX2, useCubeTexture, ...
All the hooks have extra built-in features that are useful for common situations. I recommend checking out their source code, not only because it tells you what they do, but also because it is a great way to learn about React Three Fiber.
Not all hooks are based on useLoader, so make sure to check out the Drei docs for more info.
Loading components
In case you simply want to load an asset without needing to apply advanced changes to it, Drei offers a set of components that do just that.
Gltf
More info in the docs.
SVG
More info in the docs.
Splat
More info in the docs.
Loading state
Most of us probably played games at some point in our life. Every mobile, pc, or console game has one thing in common. When you first launch them, a loading screen is displayed.
Thanks to Drei, we can easily do this ourselves, either with a pre-made or a custom one.
Loader
The easiest way to display a loading screen is by using the Loader component from Drei.
As shown in the docs, this is how you can use it:
It will display a loading overlay like the one underneath, whenever a promise is thrown and not caught by another Suspense component.
The Loader has basic customization options that you can find in the
docs.

useProgress
The useProgress hook returns all the information available about the loading state of your application. You can use this information to create a custom loading screen, provide feedback to the user, or handle other application logic.
Some info on the returned values (press info icons):
| Prop | Type | Default |
|---|---|---|
active | boolean | - |
progress | number | - |
errors | array | - |
item | string | - |
loaded | number | - |
total | number | - |
Remember that you cannot pass HTML inside the fallback of Suspense if it is inside the Canvas.
Luckily for us, Drei solves this problem with the Html component.
Html
The Html component allows you to render HTML elements from within the Canvas. It is perfect for creating a custom loading screen.
Here is an example:
And then use it like this:
Now the text is displayed in the center of our Canvas.
tunnel-rat
You can use tunnel-rat if you want even more control over your loading screen and how you display it.
It is a library you can use to create 'tunnels' between the Canvas and HTML.
You initiate a new tunnel like this:
The variable t holds two components.
<In />: The JSX you want to render.<Out />: Where you want the JSX to render.
Use them like this:
Then place the t.Out component outside of the Canvas, wherever you want to render it.
It is a very basic example, but I think you can imagine how powerful this library can be. It allows you to create complex loading screens, overlays, ... from anywhere within your Canvas.
The end
Congratulations if you made it this far! 🥳 I hope you learned something new and will implement it into your applications!
If you have any questions, feedback, or topics for future posts, feel free to leave a comment or reach out to me on X, I am always happy to hear from you!
Loading reactions...